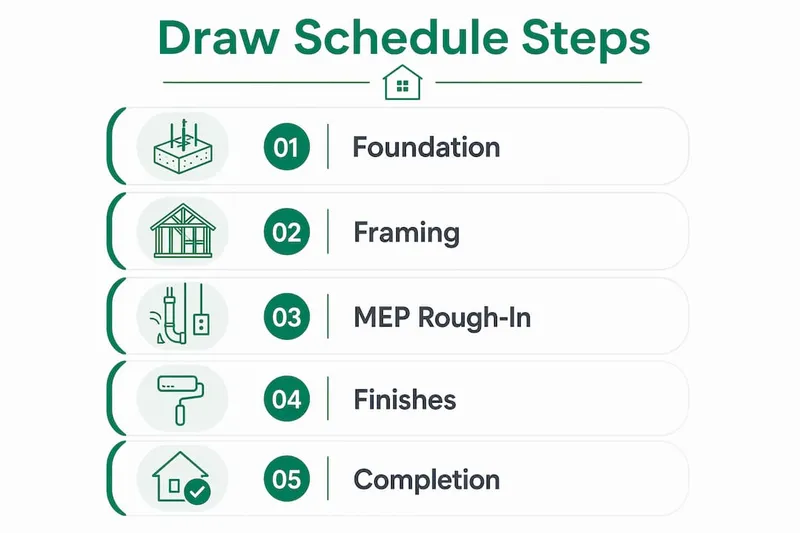
A construction draw schedule is a formal payment plan that releases funds in stages, each tied to a verified milestone in your build. Rather than paying your contractor a lump sum upfront, you release money as specific phases of work are completed and confirmed. Most residential construction loans use 5 to 7 draw stages linked to milestones such as foundation, framing, MEP rough-in (mechanical, electrical, and plumbing), drywall, finishes, and final completion. Each stage requires documented proof before funds move. A proper construction draw schedule setup protects your cash flow, satisfies your lender, and gives you real leverage over your contractor throughout the build.
What does a solid construction draw schedule setup require?
Before you write a single number into your schedule, you need three things in place: a detailed project scope, a Schedule of Values, and a complete document checklist.

The Schedule of Values (SOV) is the backbone of your draw schedule. It breaks your total contract amount into line items, each with a cost and a percentage of the whole. Your lender and contractor both reference the SOV at every draw stage, so it must be accurate from the start. Draw packages require consistent, matching documentation across AIA G702/G703 forms, invoices, lien waivers, and site photos. A single mismatch causes automatic lender rejection. Treat your documentation as a unified set, not a collection of separate files.
Documents you need before your first draw
- AIA G702/G703 forms: The industry-standard application for payment and continuation sheet, used by most lenders and contractors.
- Invoices and receipts: Itemised bills from your contractor and subcontractors matching the SOV line items exactly.
- Conditional lien waivers: Signed by each contractor or supplier before or at the point of payment.
- Site photographs: Dated photos showing completed work for each milestone.
- Permits and inspection certificates: Proof that work has passed local authority checks.
Retainage and deposit limits
Retainage of 5% to 10% is commonly withheld from each draw until substantial completion or final punch-list sign-off. This withheld amount gives you financial leverage to ensure your contractor finishes every item. Initial deposits are often capped by law. In California, for example, deposits are limited to 10% of the contract value or £1,000, whichever is lower. Check the specific rules in your jurisdiction before signing any contract.
| Document | Purpose |
|---|---|
| AIA G702/G703 | Standard payment application and itemised continuation sheet |
| Schedule of Values | Budget breakdown by trade or phase, used throughout all draws |
| Conditional lien waiver | Protects you from supplier claims; collected at each payment |
| Site photographs | Visual proof of milestone completion for lender review |
| Inspection certificate | Confirms work meets building regulations before funds release |
How to set up your construction draw schedule step by step
A clear process prevents the most common errors first-time builders make. Follow these steps before your build begins.
Define your total contract amount. Start with the signed contract figure. This is the number your SOV must add up to, including all trades and materials.
Build your Schedule of Values. List every phase of work as a separate line item. Assign a cost and a percentage to each. Common categories include site preparation, foundations, structural framing, roofing, MEP rough-in, insulation, drywall, finishes, fixtures, and external works.
Assign draw stages to milestones. Group your SOV line items into 5 to 7 draw stages. Each stage should represent a logical stopping point where work can be independently verified. Align these with your lender's inspection schedule.
Write precise completion criteria. Vague definitions cause disputes. Precise definitions such as 'all supply and drain lines installed and pressure-tested' prevent payment stalls. Write the completion standard for each milestone before construction starts.
Set your payment terms. Agree Net 15 or Net 30 payment terms with your contractor. Net 15 means payment is due 15 days after an approved draw request. Build your schedule around these terms so your contractor knows exactly when to expect funds.
Incorporate retainage. Deduct 5% to 10% from each draw payment and track the withheld total separately. Release the retained amount only after the final punch list is signed off.
Add a lender buffer. Lender inspections take 2 to 5 business days to verify work before funds are released. Add this window to your timeline so your contractor is never waiting on site without pay.
Sample draw schedule breakdown
| Draw stage | Milestone | % of contract | Example amount (£200,000 contract) |
|---|---|---|---|
| Draw 1 | Foundation complete | 15% | £30,000 |
| Draw 2 | Framing and roofing complete | 20% | £40,000 |
| Draw 3 | MEP rough-in complete | 20% | £40,000 |
| Draw 4 | Drywall and insulation complete | 15% | £30,000 |
| Draw 5 | Finishes and fixtures complete | 20% | £40,000 |
| Draw 6 | Final completion and punch list | 10% | £20,000 |
Pro Tip: Set an internal sub-billing deadline 7 to 14 days before your lender draw submission date. This gives your contractor time to gather invoices and waivers without a last-minute rush.
Common mistakes in draw schedule planning and how to avoid them
The most expensive errors in construction draw management are not financial. They are documentary.
30% to 50% of small contractors experience payment delays due to documentation mismatches between the Schedule of Values and actual site progress. That figure is significant. It means the majority of payment problems are avoidable with better preparation, not more money.
The most common pitfalls include:
- Vague milestone definitions. If your schedule says "framing complete" without specifying what that means, your contractor and lender may disagree. Define each milestone with measurable, verifiable language.
- Mismatched documentation. An invoice that does not match the SOV line item description will be rejected. Use identical wording across all documents.
- Ignoring retainage until the end. Some first-time builders forget to track withheld amounts across draws. By the final stage, the retained sum can be substantial. Know your running total at every draw.
- Underestimating inspection timelines. Lenders do not release funds the day you submit a draw request. Build a 3 to 5 day buffer into your schedule for lender processing to avoid contractors leaving site due to late payments.
- Collecting lien waivers after payment. Collecting waivers after payment loses leverage and causes delays. Require conditional waivers at the point of invoice submission, not after the cheque clears.
Pro Tip: Keep a draw log spreadsheet that tracks each draw number, submission date, lender inspection date, approval date, and payment date. This single document will resolve most disputes before they escalate.
A construction draw schedule is a risk-mitigation tool. Defining 'complete' precisely is not bureaucracy. It is the clearest protection you have against a contractor walking off site or a lender freezing your funds.
Poorly managed change orders are another frequent source of draw schedule disruption. Any scope change that affects cost must be reflected in an updated SOV before the next draw is submitted.
How do you maintain your draw schedule during the build?
Maintaining your schedule is an ongoing task, not a one-time setup. The habits you build in the first month of construction will determine how smoothly the rest of the project runs.
- Keep SOV descriptions identical across every draw. Altering Schedule of Values line items mid-project triggers lender review delays. If you called it "MEP rough-in" in draw one, use the same phrase in every subsequent draw.
- Take weekly site photographs. Date-stamp every photo and file them by draw stage. Missing photo evidence is one of the most common reasons lenders withhold payment.
- Update your SOV percentage completions weekly. Do not wait until draw submission to calculate how much of each line item is done. Track progress in real time so you are never surprised.
- Communicate payment expectations clearly. Your contractor and subcontractors need to know your draw submission dates and expected payment dates. Clear communication prevents site stoppages caused by cash flow uncertainty.
- Coordinate lender inspections in advance. Contact your lender at least one week before you plan to submit a draw request. Confirm their inspection availability and factor that into your milestone completion target.
Understanding the full home building timeline helps you anticipate which phases will generate the most documentation and plan your draw submissions accordingly.
How does a draw schedule affect your construction funding timeline?
Your draw schedule directly controls when money moves and how much interest you pay during the build.
Construction loans are typically interest-only during the build period, and interest accrues only on funds already drawn. This means a well-paced draw schedule reduces your borrowing costs. Drawing funds too early, before work justifies the payment, increases your interest burden without advancing the project. Lenders scrutinise front-loaded draws and require invoices or permits to justify early-stage costs. If you cannot document the expenditure, the draw will be delayed or reduced.
Lender inspection timelines create natural gaps in your funding flow. A draw submitted on monday may not result in a payment until the following week. These gaps affect your contractor's cash flow and, by extension, their ability to keep workers on site. Build realistic buffer days into every stage of your construction payment schedule.
| Scenario | Risk level | Impact on timeline |
|---|---|---|
| Draw submitted with complete, matched documentation | Low | Payment within 2–5 business days |
| Draw submitted with mismatched SOV descriptions | High | Manual review; payment delayed 1–3 weeks |
| Front-loaded draw without supporting invoices | High | Lender reduction or rejection of draw amount |
| Lien waivers collected after payment | Medium | Audit trail gaps; slower future draw approvals |
Final retention held until punch list sign-off is the strongest financial lever you have at project end. Releasing the final 10% only after a formal sign-off prevents unfinished work from being abandoned. Your final walkthrough is the moment to confirm every punch list item is resolved before that last payment leaves your account.
Key takeaways
A well-executed construction draw schedule setup links every payment to verified, documented progress, protecting your cash flow and your lender relationship from the first draw to the last.
| Point | Details |
|---|---|
| Use 5 to 7 draw stages | Align milestones with foundation, framing, MEP rough-in, drywall, finishes, and final completion. |
| Build your Schedule of Values first | Every draw document must match SOV line-item descriptions exactly to avoid lender rejection. |
| Collect lien waivers at invoice submission | Requiring waivers before payment maintains leverage and creates a clean audit trail. |
| Add a lender buffer to every stage | Allow 3 to 5 business days for lender inspection and processing in your construction funding timeline. |
| Withhold retainage until punch list sign-off | The final 5% to 10% is your strongest incentive for full project completion. |
What I have learned from watching first-time builders get this wrong
Most first-time builders treat the draw schedule as a formality. They sign whatever the contractor proposes, assume the lender will sort out the details, and move on. That approach costs money.
The single most damaging mistake I see is vague milestone language. A schedule that says "plumbing complete" is not a schedule. It is an invitation to a dispute. The contractor believes it means rough-in is done. The lender inspector expects fixtures installed. You are caught in the middle with funds on hold and workers waiting. Writing precise, testable completion criteria before the build starts is not extra work. It is the work.
The second pattern I notice is builders who treat documentation as an afterthought. They take photos sporadically, collect waivers late, and then scramble at draw submission time. The lenders I have seen work with first-time builders are not unreasonable. They simply require consistency. Give them the same format, the same descriptions, and the same supporting documents every time, and approvals come quickly.
My honest recommendation: set your internal sub-billing deadline two weeks before your lender submission date. Use that fortnight to chase invoices, verify photos, and confirm waivers. Arrive at submission day with a complete, matched package. You will rarely face a delay.
The draw schedule is not paperwork. It is the financial spine of your project. Treat it that way from day one.
— Azai
FAQ
What is a construction draw schedule?
A construction draw schedule is a formal plan that divides your total construction loan into staged payments, each released when a verified milestone is complete. Most residential builds use 5 to 7 draw stages aligned with key phases such as foundation, framing, and finishes.
How do I set up a draw schedule for the first time?
Start by building a Schedule of Values that breaks your contract into line items with costs and percentages. Then group those line items into 5 to 7 milestone stages, write precise completion criteria for each, and align the stages with your lender's inspection process.
What documents are needed for each draw request?
Each draw package requires AIA G702/G703 payment application forms, itemised invoices matching your Schedule of Values, conditional lien waivers from contractors and suppliers, and dated site photographs showing completed work.
What is retainage and why does it matter?
Retainage is a percentage, typically 5% to 10%, withheld from each draw payment until substantial completion or final punch list sign-off. It gives you financial leverage to ensure your contractor finishes all outstanding work before receiving full payment.
How long does a lender take to release draw funds?
Lenders typically take 2 to 5 business days to inspect completed work and process a draw request. Building a buffer of 3 to 5 days into your construction funding timeline prevents contractors from experiencing cash flow gaps between draw submissions and fund releases.