Renovations often feel chaotic before a single wall comes down. Scattered quotes, shifting budgets, and hundreds of decisions create real stress, and without a clear structure, most projects run over time and over budget. The good news is that you can simplify home renovation planning by treating it like any well-managed project: define your scope, set a grounded budget, build a phased timeline, and document every decision. This guide walks you through exactly that, with practical strategies drawn from real project management experience to keep your renovation clear, controlled, and far less stressful.
Table of Contents
- Key takeaways
- Simplify home renovation planning with a clear scope
- Building a realistic budget with the right contingency
- Crafting a practical renovation timeline
- Managing selections, decisions, and contractor communication
- What I have learnt about renovation planning the hard way
- Plan your renovation with House A-Z
- FAQ
Key takeaways
| Point | Details |
|---|---|
| Define scope before pricing | Clarify must-haves versus nice-to-haves before getting any quotes to prevent budget drift. |
| Right-size your contingency | Set aside 10–20% of your total budget as a contingency buffer, not an upgrade fund. |
| Start permits early | Submit permit applications at least three months before your planned construction start date. |
| Lock in selections early | Finalise 90–95% of material and design choices before signing contracts to protect your budget. |
| Document every decision | Keep a written log of who decided what and when to prevent costly disputes with contractors. |
Simplify home renovation planning with a clear scope
The single biggest source of confusion at the start of any renovation is not knowing exactly what you want. Before you speak to a contractor or request a single quote, you need to articulate why you are renovating and what outcome you are genuinely trying to achieve.
Start with a tiered wishlist system. Divide every item on your renovation list into three categories:
- Must-haves: Non-negotiable outcomes, such as fixing structural issues, adding a bathroom for a growing family, or upgrading an unsafe electrical panel.
- Nice-to-haves: Improvements you want but could live without, such as a kitchen island extension or underfloor heating in one room.
- Dream features: High-cost additions you would include if the budget allows, such as a full outdoor kitchen or a home cinema.
This structure does more than organise your wishlist. It gives you a decision-making framework when trade-offs arise, which they always do. Planning before pricing stabilises budgets and helps homeowners make trade-offs immediately rather than reactively during construction, when changes are far more expensive.
A room-by-room breakdown complements this approach. Walk through each space and note what is broken, what is functional but dated, and what you simply do not like. This gives your contractor a clear brief and prevents the vague "we'd like it to feel more modern" conversations that lead to misaligned expectations.
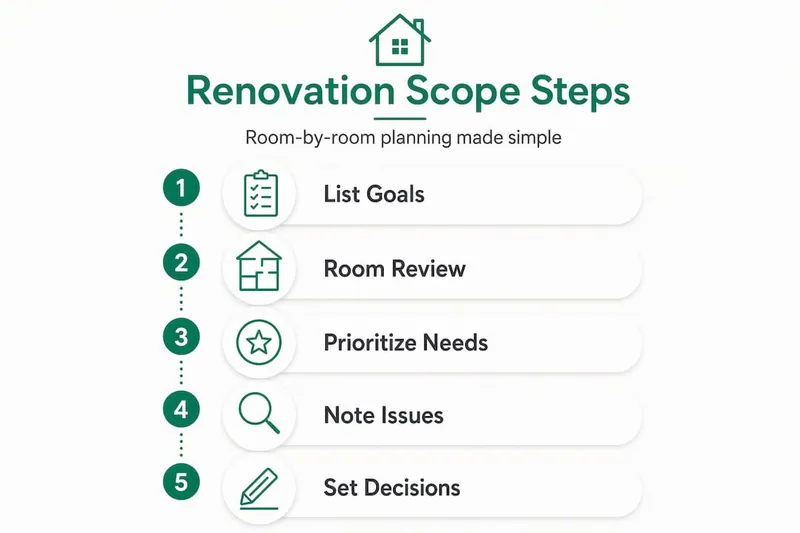
Pro Tip: Write down your top five renovation goals in priority order before your first contractor meeting. When budget pressure arrives, you will already know which items to protect and which to cut.
Building a realistic budget with the right contingency
A renovation budget that does not include a proper contingency is not a budget at all. It is an optimistic estimate waiting to be exceeded. The contingency fund covers what you cannot see before demolition begins: corroded pipes, outdated wiring behind walls, unexpected structural issues, or permit delays that push your schedule and inflate your labour costs.
How large should your contingency be? The answer depends on your project type and the age of your home:
- New builds or straightforward cosmetic refurbishments: A 10% contingency is generally appropriate.
- Major renovations in homes older than 30 years: A 15–20% contingency is strongly advised. A 20% contingency buffer is recommended specifically to absorb unforeseen costs behind walls and other surprises.
- Full structural renovations or extensions: Consider 20% as your baseline, not your ceiling.
Beyond the contingency, your core budget should be broken into four categories: labour, materials, permits and professional fees, and fixtures and finishes. Getting quotes for each category separately gives you far better control than a single lump-sum number from a contractor.
One point that many homeowners miss: your contingency is an engineering-style buffer, not a discretionary spending fund. Contingency is sized to unseen risks, not frozen money for upgrades. If you find yourself eyeing a more expensive tile mid-project, that cost should come from your fixtures budget, not your contingency reserve.
Locking in your selections early protects that reserve. Locking 90–95% of selections before signing contracts leads to better pricing accuracy and fewer financial shocks during the build. Use a budget planning checklist to work through every cost category before you commit to a contractor.
Pro Tip: Never dip into your contingency for cosmetic upgrades or spontaneous design changes. If you spend it before the walls are opened, you have nothing left when a genuine problem surfaces.

Homeowners with documented renovation plans save 15–20% on total costs by reducing change orders. Change orders, which are contractual amendments for scope adjustments made after signing, increase project expenses by an average of 23%. The clearer your plan before signing, the fewer surprises you pay for afterwards.
Crafting a practical renovation timeline
A timeline is not just a schedule. It is a tool for keeping everyone, including you, your contractor, and your suppliers, aligned on what needs to happen and in what order. Getting the sequence wrong is not just inconvenient. It is expensive.
The table below outlines typical renovation phases and their durations for a medium-scale project such as a kitchen or bathroom refurbishment:
| Phase | Typical duration | Key actions |
|---|---|---|
| Goal setting and scope definition | 1–2 weeks | Tiered wishlist, room-by-room notes, priority ranking |
| Design and selections | 3–6 weeks | Finalise drawings, lock materials and fixtures |
| Permit application | 4–6 weeks | Submit full application, respond to council queries |
| Contractor hiring | 2–4 weeks | Collect at least three quotes, check references |
| Material ordering | 2–6 weeks | Order long-lead items such as cabinets and tiles |
| Construction and installation | 4–16 weeks | Follows sequenced phases from demolition to finishing |
| Final walkthrough and sign-off | 1–2 weeks | Defects list, final payments, documentation |
Typical phase durations in a structured timeline include 4–6 weeks for permits and 2–4 weeks for contractor hiring, with a clear order from goal setting to final walkthrough. One of the most common errors is treating these phases as sequential with no buffer. Real projects rarely run on perfect schedules. Build in buffer time at every phase, particularly for materials and permits.
Permit timing deserves particular attention. Starting permit applications at least three months before your planned construction start significantly reduces delays. Your contractor may submit the application on your behalf, but you remain the legally responsible party.
Pay close attention to delivery windows for long-lead items. Sequencing demolition relative to delivery windows for cabinets and countertops specifically avoids rework that can cost thousands. A cabinet template, for example, must be measured from the actual installed walls. If you demo before your cabinets are ready to be templated, your entire kitchen installation sequence stalls.
Pro Tip: Link your demo start date directly to the confirmed delivery window of your most critical long-lead item. Do not schedule demolition until you have a firm delivery date.
Managing selections, decisions, and contractor communication
Even with a solid budget and timeline, renovations go off track when decisions are not documented and communication is not structured. This is where many otherwise well-planned projects quietly unravel.
Start by establishing a written decision log. For every selection and change made during the project, record:
- What was decided (the specific product, material, or action)
- When the decision was made
- Who made or approved it
- Why the decision was taken (particularly useful when revisiting choices later)
A written decision log capturing who decided what and why prevents misunderstandings and costly disputes. Without documentation, your memory and your contractor's memory of the same conversation will often differ significantly.
Beyond documentation, set clear communication protocols at the project's start. Agree on a single channel for written instructions (email works well for creating an automatic paper trail), a response time expectation for queries, and a process for raising and approving change orders. Any scope change, however small, should go through a formal change order before work begins.
For selections, adopt a staged approach rather than deciding everything at once. Approving selections as a staged pipeline reduces decision fatigue and preserves your contingency. Group decisions by phase: structural choices first, then wet room fixtures, then finishes and fittings. This prevents the exhaustion that leads to poor, expensive, last-minute choices.
One useful tool is a one-page dependency plan. Map out which decisions are irreversible (structural, plumbing rough-in locations, floor levels) and which are more flexible (paint colours, light fittings). Irreversible decisions must be locked before the phase that depends on them begins. Flexible decisions can wait, giving you breathing room without slowing the project down.
Pro Tip: Before construction begins, review your selections list and identify every irreversible decision. Set a firm deadline for each one that sits at least two weeks before its dependent work phase starts.
Milestone-based payments also support accountability throughout the project. Paying in milestones tied to completed phases, rather than large upfront sums, reduces the risk of overspending and keeps contractors motivated to progress. Use a builder selection guide to assess candidates before committing, particularly if you are new to working with tradespeople.
What I have learnt about renovation planning the hard way
I have reviewed and supported dozens of renovation projects at various stages, and the pattern is always the same: the projects that go smoothly are not the ones with the biggest budgets. They are the ones where the homeowner did the hard thinking before a single tool was picked up.
The most underestimated issue I see is decision fatigue. By week four of a mid-scale renovation, most homeowners are exhausted by choices. They approve things quickly, skip the documentation, and start treating the contingency as a shopping fund. The staged pipeline approach genuinely changes this. When you know that paint colours can wait but the drain locations cannot, you stop trying to solve everything at once.
Lead times are the silent cost driver I wish more people understood early. I have seen kitchen renovations delayed by eight weeks because cabinet delivery was scheduled after demolition, not before. Lead-time-driven scheduling forces you to lock irreversible decisions before demolition begins, and that discipline alone can save you thousands.
My honest take: most renovation stress is not caused by contractors or unexpected problems. It is caused by homeowners who started building before they finished planning. Spend twice as long on your scope, your priorities, and your budget before you book a contractor. You will spend half the time stressed during the actual build.
— Azai
FAQ
What is the first step to simplify home renovation planning?
Define your renovation scope before seeking quotes. Create a tiered wishlist separating must-haves from nice-to-haves so every subsequent budget and scheduling decision has a clear reference point.
How much contingency should I budget for a renovation?
Set aside 10–20% of your total project cost as a contingency, with older or structurally complex homes requiring the higher end. Treat this as a risk buffer only, not a fund for upgrades.
When should I apply for building permits?
Submit your permit application at least three months before your planned construction start date. Standard residential permits typically take 4–6 weeks to process, and delays in approval will push your entire schedule back.
Why should I lock in material selections before signing a contract?
Locking 90–95% of your selections before contracts are signed gives your contractor accurate pricing data and protects your contingency from being spent on mid-build upgrades or changes.
What is a decision log and why does it matter?
A decision log is a written record of every project decision, including what was decided, when, and by whom. It prevents disputes between homeowners and contractors by creating a shared, documented reference for the entire project.