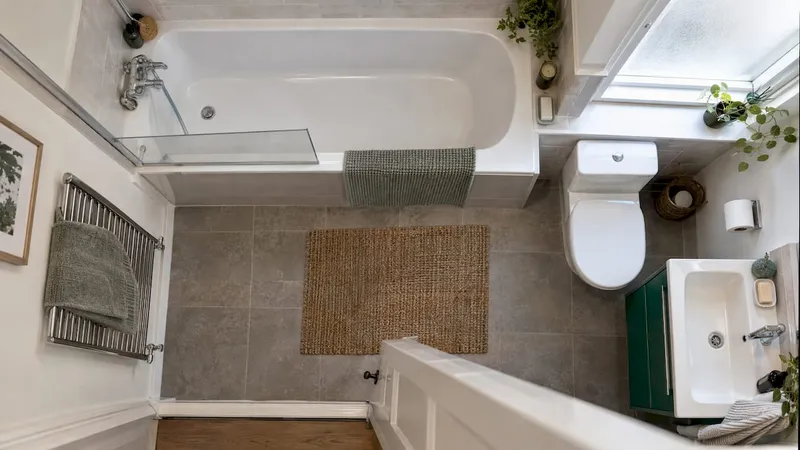
A good bathroom layout comes down to four things: enough clear floor in front of every fitting, a door that does not steal that floor, fittings kept close to the existing pipework, and a plan settled before anyone starts demolition. Get those right and most of the rest is taste. Get them wrong and you pay for it in tiles, plumbing and patience. We built House A-Z so that first-time renovators can test a layout, see the budget and share it with a partner or tradesperson before a single pipe is moved.
TL;DR
- Leave roughly 60 cm of clear space in front of the toilet and basin, and a little more at the shower entrance. Guidance is mostly published in inches, so the metric figures below are converted.
- Keep the toilet, basin and shower on or near the existing waste stack: water supply is easy to move, drains need a fall.
- Choose the door swing early. An inward-opening door can eat usable floor; outward-opening, sliding or pocket doors free it.
- Electrical zones around the bath or shower dictate which lights and fittings you can use where.
- Draw two layouts to scale, price both, and lock every decision before demolition.
Table of Contents
- The clearances that decide whether a bathroom feels comfortable
- Plan the door first
- Work with the pipes, not against them
- Wet zones and dry zones
- Layouts by room size
- Make it work for everyone who uses it
- From rules to a plan: a practical order
- Where House A-Z fits in
- Our view on bathroom layouts
- FAQ
- Sources
The clearances that decide whether a bathroom feels comfortable
Most published bathroom "rules" are really clearance figures. They come from US building codes and design guidelines, because that is where the best-documented numbers are, and they translate well into everyday UK planning. Treat them as a reliable yardstick for comfort and ask your installer or building control about the specifics for your property.
Here is what the main sources say, with approximate metric equivalents (1 inch is 2.54 cm):
| Clearance | Code minimum | Comfort guideline |
|---|---|---|
| In front of toilet and basin | 21 in (about 53 cm) under the IRC | 30 in (about 76 cm) from the front edge of every fitting to the opposite fitting, wall or obstacle, per the NKBA |
| Toilet centre to side wall or fitting | 15 in (about 38 cm) | 18 in (about 46 cm) recommended by the NKBA |
| In front of shower entrance | 24 in (about 61 cm) | At least 24 in in front of a shower entry, NKBA |
| Toilet centre to centre of another fitting | n/a | 30 in (about 76 cm) |
The IRC is the International Residential Code, a US model building code. The NKBA is the National Kitchen & Bath Association, a US trade body whose planning guidelines are widely used by designers. Neither is UK law, but the numbers describe how much room a body actually needs, and that does not change at the border.
What the numbers mean in a real room
The toilet is the fitting people most often squeeze. The 15 in (about 38 cm) minimum from its centreline to a wall means a toilet needs a space roughly 76 cm wide. In front, 53 cm is the bare minimum; 60 cm or more feels ordinary rather than tight, and the 76 cm guideline feels generous.
The shower has its own rule. One US source sets a minimum shower interior of 30 by 30 in (about 76 by 76 cm) and recommends 36 by 36 in (about 91 by 91 cm) or larger for comfort. If you ever stood in a shower where your elbows touch the glass, you know why.
A worked example
Imagine a room 2.1 m long and 1.7 m wide, a classic family bathroom. The JLC Field Guide describes the traditional layout as dictated by a 5 ft standard bath and about 7 ft between bath, toilet and basin, and it also calls for a clear walkway at least 32 in (about 81 cm) wide at entrances. Put the bath along the 1.7 m wall. Place the toilet and basin on the opposite short wall. The toilet needs 76 cm of width and 53 cm or more in front; the basin sits beside it. The remaining floor is your walkway, and if it is under about 80 cm, you have found the point where a shorter bath or a shower is the better trade.
Plan the door first
People fall in love with a fitting arrangement and only then notice the door. A door that opens inward sweeps an arc across the floor, and that arc must stay clear of the toilet and basin. As one UK-region guide notes, an inward-opening door can take up usable floor space, while an outward-opening, sliding or pocket door can free it.
Do this early, because the choice changes the clearances above. A pocket door needs a wall cavity, so check what is inside that wall before you commit. Outward-opening doors can collide with the landing or a neighbouring door. Mark the swing on your plan as a quarter-circle and treat it as occupied floor.
Work with the pipes, not against them
The most useful layout rule is also the least glamorous: follow the drain. That Manx guide advises planning around the soil pipe, window, door swing and joists, then placing the WC, basin and shower and settling the layout before first fix. First fix is the stage when pipes and cables are run before walls and floors are closed up.

A US contractor guide explains why: the wet wall is where the drain, waste and vent lines already run, and keeping fixtures on or near it is the most budget-friendly layout, because water supply lines move easily but drains need proper slope and venting. Moving a toilet even a short distance can mean opening the floor. In UK terms, that is the soil stack and the waste run to it.
What this means for you:
- Mark the existing stack, waste runs and water supply on your plan before you draw a single new fitting.
- Move basins and showers before you move the toilet. They are cheaper to relocate.
- Ask whether the floor structure can take new pipe runs. Joists run in one direction and cannot be cut freely.
- If you want to see how pipe positions translate into heights, our guide to plumbing rough-in heights lists the standard measurements.
One more point from a bathroom planning guide: a beautiful layout that cannot drain correctly is not viable, so check drainage and service constraints early.
Wet zones and dry zones
A bathroom is two rooms in one: a wet area around the bath or shower, and a dry area for the basin, storage and the toilet. Good layouts keep these apart where they can, so water does not travel across the whole floor and towels stay dry.
The same guide advises you to define the wet areas and coordinate waterproofing extent, substrates, floor falls and drains before you finalise finishes. Practically, that means deciding where the tanking (the waterproof membrane) stops, how the floor slopes to the drain and what sits under the tiles, before you choose the tiles.
If your plans involve structural changes, an extension or a conversion, the interior plan and the paperwork travel together. Drawings with 3D views and building permit advice help you coordinate those wet-area boundaries and the finishes around them before construction begins.
Electrical zones
UK wiring rules divide the area around a bath or shower into zones, and they decide what you can install where. Under BS 7671, the UK wiring regulations, Zone 0 (inside the bath or shower) needs IPX7, while Zones 1 and 2 need at least IPX4. Zone 1 runs directly above the bath or shower up to 2.25 m, and Zone 2 extends 0.6 m beyond it. IP ratings measure how well a fitting resists water.
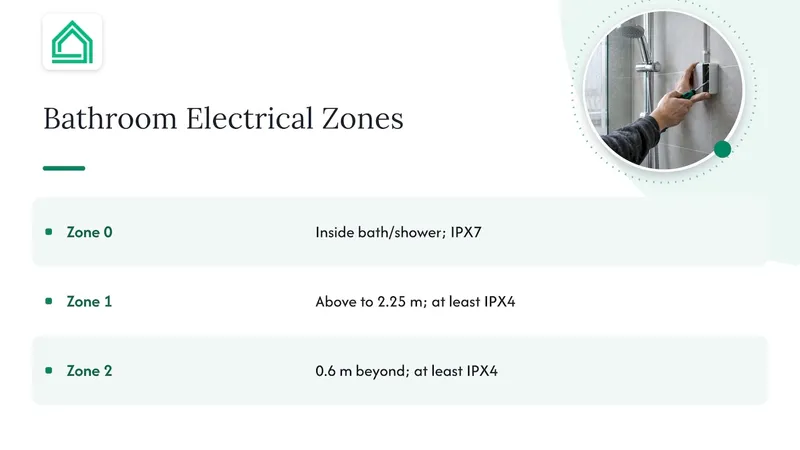
For your plan, draw the zones around the shower or bath in a different colour and keep that outline in mind for lights, extractor fans and sockets. Bathroom electrics are a job for a registered electrician, who will certify the work.
Layouts by room size
The fixtures you include matter more than the label on the room.
- Shower room (sometimes called a 3/4 bath in US terms): toilet, basin and shower, no bath. One US guide says it can work in a space as small as 5 by 6 ft, about 1.5 by 1.8 m, and that a full bath needs at least 5 by 7 ft (about 1.5 by 2.1 m). A corner shower is a common way to save space.
- The 5 by 7 ft room: the footprint of the classic bath, toilet and basin run. Another source gives 5 by 7 ft as the minimum for a 3/4 bath, with 5 by 8 ft common. Everything is tight, so every clearance figure above becomes a decision.
- Larger family bathroom: you have the luxury of a separate bath and shower, or a double basin. The risk flips: with space, people spread fittings along different walls and add plumbing cost for no gain.
Make it work for everyone who uses it
A bathroom that suits a fit 30-year-old may not suit you at 70, or a guest with a stick. Accessible-design guidance suggests organising the room around the user's mobility, transfers, seated or standing use and carer space, with a level-access shower and thermostatic anti-scald controls. A level-access shower has no tray lip to step or wheel over.
Even if nobody needs this today, choosing a wider doorway, a floor with a gentle fall and space beside the toilet costs little at planning stage and a lot later. If a family member has specific needs, an occupational therapist can assess what they need in the room.
From rules to a plan: a practical order
The research on this is consistent. A good plan is built in this order:
- Measure the room, including the window, door and any boxing around pipes.
- Locate the existing plumbing: stack, waste runs, supply, and the direction of the joists.
- Sketch at least two layouts to scale, marking clearances and door swing on each. This is the approach recommended by one renovation contractor.
- Price both. Keeping fixtures on or near the wet wall usually keeps cost down.
- Lock the decisions before demolition.
Step five is where budgets are won or lost. A US remodelling firm advises locking all 12 of its listed decisions before demolition and says changes after it typically cost $500 to $3,500 per change order. Those are US dollar figures, but the principle holds: a line on a drawing costs nothing, and a moved pipe does.
When you are ready to turn the layout into a job, our guides cover the bathroom remodel steps in the correct order, a project plan with checklist and Gantt chart, the timeline and UK renovation costs.
Our view on bathroom layouts
Most renovation regret starts with a layout nobody tested on paper. Couples often agree on the look of a bathroom in a weekend, then discover during first fix that the toilet cannot move where they pictured it, or that the door now hits the vanity.
We designed House A-Z for people who are not professionals, so it works in plain language. Our AI agents give personalised insights based on your budget, preferences and timeline, and we aim to bring real product pricing, room layouts and project management into one platform, so you are not juggling spreadsheets and separate apps.
Our approach to layout is simple: map the room, compare options, see what each costs, and decide together before the work starts. Clarity at that stage is where our users have found the biggest savings, with one testimonial describing €20K of potential errors avoided.
Azai
FAQ
What is the recommended distance between a toilet and a sink?
The guidance we found measures it from the toilet centre. One source recommends at least 30 in (about 76 cm) from the toilet centre to the centre of another fitting such as a sink, and 15 in (about 38 cm) from the toilet centre to a wall or partition. In a small room, that centre-to-centre figure is often the first to be compromised, so draw it to scale.
Is a 5 by 7 foot bathroom too small?
No. It is the classic bath, toilet and basin footprint, and a shower room can work in less. It leaves little spare floor, so check clearances and door swing carefully, and consider a corner shower or a pocket door.
What is a 3/4 bathroom layout?
It is a US term for a bathroom with a toilet, basin and shower but no bath. UK readers would usually call it a shower room. It suits guest suites and secondary family bathrooms, and a corner shower is a common way to save space.
How should a bathroom be organised?
Separate wet and dry areas, keep fittings on or near the existing drain, protect the clearances in front of each fitting and decide the door swing before anything else. Then check the electrical zones around the bath or shower before choosing lights and fans.
Sources
- NKBA Bath Planning Guidelines
- Bathroom Layout and Clearances: The Complete Reference
- Bathroom Layout Ideas by Size and Clearance
- How to Design a Bathroom Wet Room, This Old House
- How to Plan a Bathroom Layout: Space Planning, Clearances
- JLC Field Guide: Interiors
- How to plan a bathroom layout: space, zones and pipework
- Bathroom Planning Guide
- UK Bathroom Lighting Zones and IP Ratings Guide
- Small Bathroom Floor Plans: Layouts for Every Size
- The Complete Guide to Accessible Bathroom Design
- 12 Decisions to Make Before a Bathroom Remodel Starts