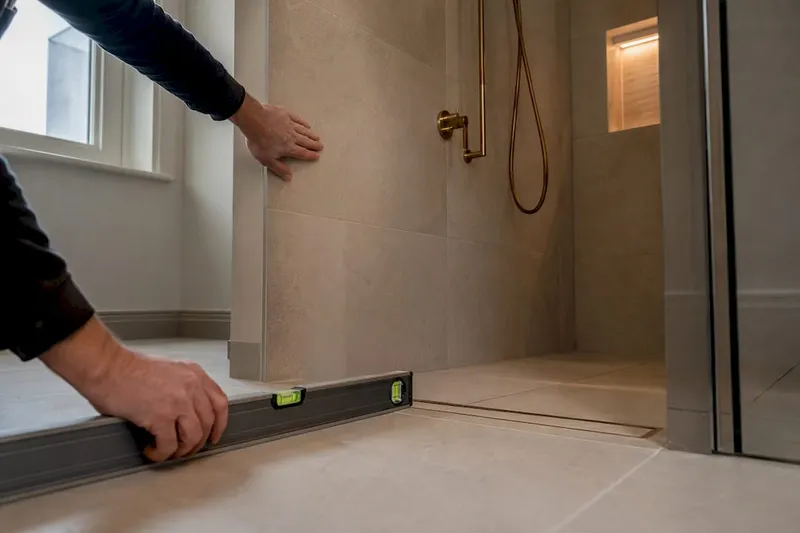
Never accept renovation handover until you have completed a systematic room-by-room walkthrough and received the full documents pack. That includes, at minimum, the building-completion certificate and appliance or manufacturer warranties, collected the same day. Hold final payment or a retention until every major defect is agreed in writing. Sign before either condition is met, and you lose most of your leverage.
TL;DR:
- Final payment should be withheld until all major defects are documented, agreed upon in writing, and all required certificates and warranties are collected on the same day.
- A thorough room-by-room walkthrough is essential, focusing on detail defects like uneven sealants, misaligned doors, and faulty electrical grounding, with exterior inspections prioritized.
- Proper documentation, including building control certificates, safety approvals, warranties, and test records, must be scanned, stored in one folder, and registered immediately to protect warranty rights.
- A snagging list must clearly distinguish defects from incomplete work, include photos with timestamps, and be prioritized by safety and potential future damage risks to ensure effective remediation.
- Post-handover, schedule routine maintenance checks, keep detailed records of repairs, and confirm safety systems are fully functional, with clear communication and written agreements for all outstanding issues.
Table of Contents
- What goes on your renovation handover checklist walkthrough?
- Which documents and certificates should you collect at handover?
- How do you create a snagging list that actually gets acted on?
- What happens after the walkthrough: payment, timing and escalation?
- How a planning tool centralises your handover pack
- What maintenance should you schedule after handover?
- How do you resolve disagreements found during handover?
- How do you make sure your warranties stay valid?
- Who should attend handover, and what is each person's role?
- How should you communicate during the handover process?
- What safety checks apply specifically to finished renovation work?
- One habit that saves disputes later
- Build your handover pack with House A-Z
- Sources
- FAQ
What goes on your renovation handover checklist walkthrough?
The walkthrough is where a renovation handover checklist earns its keep. Work through the property systematically, room by room, rather than skimming for anything obviously wrong. Defects hide in the details: a door that binds slightly, a socket that is live but poorly earthed, a shower fall that pools water in one corner. None of these jump out on a casual look.
Start outside, because exterior faults are the most expensive to leave unchecked. Inspect the roofline, gutters, downpipes and drainage falls for standing water. Check external finishes, render, cladding, and fencing for gaps, cracking, or poor fixing.
Move through general rooms next. Paint and plaster quality is best judged with raked light: hold a torch at a low angle across the wall and watch shadows expose bumps, trowel marks, or hollow filler that flat daylight hides completely. Check floor levels with a spirit level near skirting boards, and run a hand along joinery joints to feel for gaps.
Doors and windows deserve individual attention rather than a glance:
- Open and close every door and window fully, checking for binding, dragging, or uneven gaps.
- Test every lock, latch, and hinge under normal pressure, not just a light touch.
- Check seals and weatherstripping for continuous contact, and glazing for scratches, chips, or condensation between panes.
In the kitchen, check benchtop joins for level and gap consistency, confirm cabinet doors align and close flush, and verify every appliance is correctly plumbed, wired, and sealed at the worktop junction. A sink or hob that has not been sealed properly is one of the more common snags flagged during renovation completion checks.
Wet areas need particular scrutiny. Check tile lippage (the height difference between adjacent tiles) by running a hand across the surface, confirm the shower floor falls correctly towards the drain rather than pooling, and check silicone sealing is continuous with no gaps at junctions.
Finally, test every system while you are still on site. Run every tap for hot and cold, check radiators heat evenly across their full surface, confirm the boiler has a commissioning record, and test mechanical ventilation with heat recovery (MVHR) if it is installed. On electrics, test every switch and socket, check the consumer unit is clearly labelled, and confirm smoke and heat alarms are fitted and functioning.
Pro Tip: Bring a torch and a spirit level rather than relying on your phone. Raked light from a torch reveals plaster and paint defects that a phone's flat flash simply washes out.

Which documents and certificates should you collect at handover?
A renovation handover checklist is only half the job without the paperwork to back it up. Documents prove the work meets regulation, protect your warranty rights, and matter enormously if you sell the property later.
- Building control or completion certificate. Issued by local authority building control or an approved inspector, this confirms the work complies with building regulations. In the UK, this is the document you need for building regulations approval, and equivalent sign-off processes exist elsewhere, including the completion process New Zealand homeowners go through.
- Electrical and gas safety certificates, showing the installer's registration number and scheme mark.
- Manufacturer manuals and registered warranties for every appliance and system installed, ideally registered in your name on the day.
- Commissioning and test records for underfloor heating, MVHR, or air conditioning, plus as-built drawings showing what was actually installed versus what was designed.
Scan or photograph everything and store it in one named folder rather than a drawer of loose paper. Chasing a missing warranty six months after handover is far harder than collecting it on the day.
How do you create a snagging list that actually gets acted on?
A snagging or punch list only works if it distinguishes a genuine defect from incomplete work. A defect is something finished incorrectly; incomplete work is something not yet done. Mixing the two on one list confuses contractors about what needs fixing versus what still needs finishing.
Every entry needs four things to be enforceable rather than just noted:
- A unique reference number.
- The room and precise location.
- A wide photo showing context and a close photo with a timestamp.
- A plain-language description anyone could understand without seeing the defect in person.
Industry guidance is consistent that a snagging list is a formal remediation schedule, not a cosmetic wish list, and should be prioritised by safety and future-damage risk first, and appearance last. A loose handrail or an unsealed shower tray that could cause water damage outranks a slightly uneven paint line, even though the paint line is more visible day to day. Agree a written rectification timeline for each item and set a firm reinspection date. Verbal promises to "sort it soon" are the single most common reason snagging drags on for months.
What happens after the walkthrough: payment, timing and escalation?
Most minor snags typically get resolved within a few weeks after you have issued the list, though timing depends on the contractor's workload and the scale of items outstanding. Issue your snagging list the same day as the walkthrough while details are fresh and evidence is fresh too.
- Withhold final payment or a contract retention until major defects are fixed or you have a signed written agreement covering what remains outstanding and by when.
- Bring in an independent snagging inspector if the list is long, disputed, or the contractor pushes back on items you consider clear defects.
- Escalate to building control or a consumer protection body if certificates are missing entirely or the contractor refuses to rectify safety-related items. NSW homeowners, for instance, can lean on the practical steps set out by Fair Trading NSW after you build or renovate.
- Keep dated written records of every communication, agreement, and completed rectification.
Pro Tip: Never accept a verbal "it's on the list" for a safety item. Get the fix date in writing before you release any payment tied to it.
How a planning tool centralises your handover pack
Chasing paper warranties after the fact is exactly what a central digital folder avoids. Storing as-built drawings, commissioning records, and manuals in one place, rather than across contractor emails and a kitchen drawer, means you can find any document the moment a query arises.
Timestamped photo logs tied to a unique defect reference reduce disputes because there is no ambiguity about when a fault was flagged or what it looked like. Project tracking, budget tools, and contractor collaboration features exist to support this stage of a build, helping users catch issues before they become costly.
What maintenance should you schedule after handover?
Handover is not the finish line. It is the start of a maintenance schedule that protects the work you have just paid for. Most warranties carry conditions requiring routine upkeep, so skipping this stage can quietly void cover you assumed was permanent.
Set quarterly reminders for the first year: check silicone seals in wet areas for early signs of lifting, test smoke and heat alarms, and inspect gutters after autumn leaf fall. Boilers and MVHR units typically need annual servicing to keep their warranty valid, and this is usually written into the manufacturer's terms rather than optional good practice.
Underfloor heating and new timber flooring often need a settling period, sometimes with specific humidity or temperature guidance from the manufacturer, so read the commissioning notes rather than assuming normal use is fine from day one. Re-inspect any snagging items that were rectified after three to six months. Some fixes, particularly plaster cracking or door alignment, only reveal whether they have held once a property has gone through a full heating cycle.
Keep your document folder updated as you go. Add service records each time a system is checked, so the file grows into a genuine maintenance history rather than a static handover snapshot.
How do you resolve disagreements found during handover?
Disputes at handover almost always come down to one of two things: disagreement over what counts as a defect, or disagreement over who is responsible for fixing it. Both are far easier to resolve when your snagging list already separates defects from incomplete work with photo evidence attached.
Start with a direct written exchange referencing the specific snag number, photo, and the contract clause it relates to if one exists. Most disagreements resolve at this stage once both sides are looking at the same evidence rather than a memory of the walkthrough.
If the contractor disputes an item you consider clear, an independent snagging inspector's report often settles it without further argument, since it removes the personal element from the disagreement. For unresolved building-standard disputes, Fair Trading NSW's contract checklist sets out the kind of contractual detail that makes these disputes easier to resolve, and equivalent consumer bodies exist in most jurisdictions.
Where a contractor refuses outright to acknowledge a legitimate safety defect, retention becomes your main point of leverage. Do not release it until either the item is fixed or you have a dated, signed agreement covering the outstanding work and a fixed completion date. Avoid verbal deals entirely at this stage; write everything down, however small the item seems.
How do you make sure your warranties stay valid?
Warranty validity is decided largely by paperwork, not by the quality of the work itself. A perfectly installed boiler with an unregistered warranty offers you no protection at all if it later fails.
Register every appliance and system warranty in your own name on the day of handover, not weeks later when the registration deadline may have already passed. Many manufacturers set a strict window, often 30 days, after which cover can be reduced or voided entirely.
Keep proof of professional installation for anything requiring certified fitting, boilers, electrics, and gas appliances in particular, since most warranties are void if installed or commissioned by someone unregistered for that trade. Retain your commissioning records alongside the warranty document itself; some manufacturers ask for both if you ever make a claim.
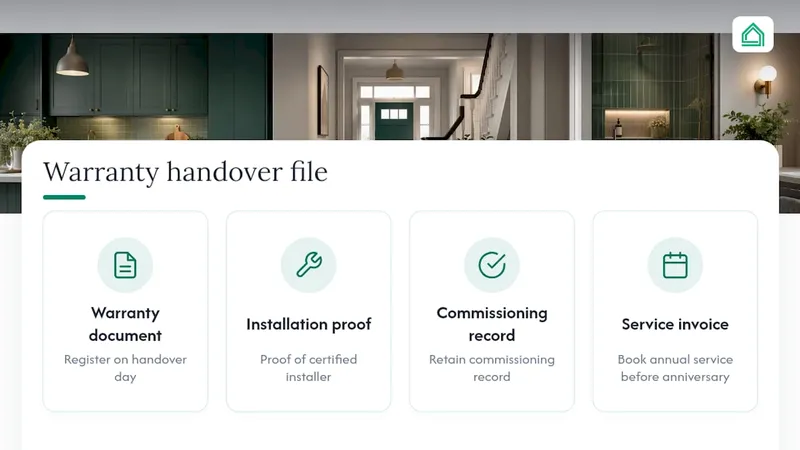
Avoid DIY modifications to systems still under warranty. Something as small as adjusting a boiler's internal settings yourself, rather than through a registered engineer, can void cover even if the fault that later appears is unrelated. Where a warranty depends on annual servicing, book that service before the anniversary date each year and keep the invoice with your handover file.
Who should attend handover, and what is each person's role?
A handover walkthrough with the wrong people in the room, or the right people with unclear roles, produces vague notes and disputed responsibility later. Clarity here saves time during the walkthrough itself.
The homeowner or client should attend in person wherever possible, since photographs and written snag lists never fully replace physically testing a door, running a tap, or standing in a shower to check the fall. The main contractor, or their appointed site representative, needs to be present to respond to items in real time and commit to rectification dates on the spot rather than "getting back to you."
Where a project manager or independent clerk of works has been used throughout the build, they should lead the walkthrough procedurally, keeping the pace consistent and making sure every room gets equal attention rather than rushing the last few. Subcontractors, plumbers or electricians in particular, only need to attend if a specific system under their trade is in question, such as an unresolved dispute about a boiler commissioning fault.
Assign one person, usually the homeowner or project manager, as the single point who compiles the final snagging list from everyone's notes. Splitting that responsibility across multiple people is a common reason items get duplicated, contradicted, or simply lost.
How should you communicate during the handover process?
Communication problems, more than build quality, are what turn a smooth handover into a drawn-out dispute. Most of this comes down to timing and format rather than tone.
Issue the snagging list in writing within 24 hours of the walkthrough, while photo evidence and everyone's memory of the discussion are still fresh. Sending it a week later invites disagreement over what was actually said on the day.
Use a single shared channel, email thread, or shared folder, for every handover-related communication rather than splitting it across text messages, phone calls, and site conversations. A contractor who has verbally agreed to fix something but never received it in writing has, in practice, agreed to nothing enforceable. Confirm every agreed rectification date back to the contractor in writing, and ask them to reply confirming they have received and accepted it. That single email exchange is often what protects you if a dispute escalates later.
What safety checks apply specifically to finished renovation work?
Completed renovation work carries safety risks that a purely cosmetic inspection can miss entirely, particularly around anything touching gas, electrics, or structural changes.
Confirm every smoke alarm and, where relevant, heat or carbon monoxide alarm is fitted, powered, and tested, not just installed. The Health and Safety Executive's construction guidance sets out the safe-site expectations that should have applied throughout the build, and a tidy, hazard-free site at handover is itself a signal of how carefully the contractor worked.
Check that any structural alterations, removed walls, new openings, or altered floor loading, carry the paperwork confirming a structural engineer or building control signed them off. This is separate from the general completion certificate and easy to overlook. Confirm fire doors, where required, close fully and self-latch, and that any new glazing near floor level or in doors meets safety glazing standards. Statutory frameworks around practical versus final completion also affect when certain safety obligations formally transfer to you as the owner, so it is worth knowing which stage your project has actually reached.
One habit that saves disputes later
Number every defect photo and upload it to a shared folder the same day. It turns vague memory into a dated evidence trail, speeding rectification and settling disagreements before they start. See our photo documentation guide for the exact method.
— Azai
Sources
- Gov
- Construction - HSE
- After you build or renovate - Fair Trading NSW
- Completing your project - Building Performance (NZ)
- Renovation handover checklist - Build Design Hub
FAQ
How do you prepare a handover checklist for renovation?
Split it into a physical walkthrough checklist covering every room and system, and a separate documents checklist covering certificates and warranties. Work through both on the same day, since a defect found during the walkthrough often needs to be cross-checked against a certificate or commissioning record.
What should you include on a home handover checklist?
Cover exterior finishes and drainage, paint and floor quality checked under raked light, doors and windows, kitchen and wet area sealing, and every electrical and plumbing system tested live. Pair each check with the certificate or manual that proves it was done correctly, following the structure set out in a practical renovation handover checklist.
What is the ultimate checklist for home renovation completion?
There is no single official master list, but a reliable version combines a room-by-room defect check, a documents pack, a snagging protocol with photo evidence, and a payment retention held until major defects are resolved. House A-Z's project tools are built to organise exactly these four elements in one place.
What documents should be included in a construction handover?
At minimum: the building-completion certificate, electrical and gas safety certificates, manufacturer manuals and registered warranties, and commissioning records for any heating or ventilation systems. In the UK, the completion certificate ties directly to building regulations approval, and equivalent sign-off documents apply in other jurisdictions.