
The standard rough-in heights that govern nearly every bathroom fitting are: toilet drain 12 inches from the finished wall centre, vanity drain 16–20 inches, sink supply lines around 20–22 inches, shower valve about 48 inches, and showerhead 72–80 inches. Every one of these figures is measured from the finished floor level (FFL), never the bare subfloor. Get that single rule wrong and every pipe above it ends up misaligned once tile, backer board and thin-set go down.
- Toilet: 12in centreline from finished wall (10in/14in in some layouts)
- Vanity drain: 16–20in above FFL
- Sink supply lines: 20–22in above FFL
- Shower valve: ~48in from shower floor
- Showerhead: 72–80in above FFL
Treat these as starting points, not gospel. Always cross-check against the manufacturer's cut sheet for the exact fixture you're installing before you cut into a stud.
Key Takeaways
Correct plumbing rough-in heights depend on one non-negotiable rule: measure every fixture from the finished floor level, never the subfloor, and confirm against the manufacturer's cut sheet before committing.
| Point | Details |
|---|---|
| Measure from FFL | Always calculate heights from the finished floor level, including tile and backer thickness, not the bare subfloor. |
| Toilet rough-in is 12in | Standard is 12in from the finished wall centre, with 10in and 14in as common alternatives. |
| Vanity ranges are flexible | Drain sits 16–20in and supply lines 20–22in above FFL, adjusted for vessel sinks or deep basins. |
| Shower heights vary by household | Valve height (~48in) and showerhead height (72–80in) should reflect who actually uses the shower. |
| Dry-fit before closing walls | Confirm fixtures, cabinets, and cut sheets on site before plasterboard or tile locks anything in. |
Table of Contents
- Toilet rough-in heights and clearances
- Vanity plumbing rough-in: drain and supply heights
- Shower and bath rough-in heights
- How to measure and mark rough-in positions correctly
- Common rough-in mistakes and how to dodge them
- Quick reference: rough-in benchmarks and acceptable ranges
- How House A-Z helps first-time renovators get it right
- Drainpipe slope and positioning during rough-in
- Vent pipe rough-in heights and locations
- Floor drains and cleanouts: rough-in considerations
- Wall framing and blocking effects on fixture heights
- What actually matters when you're setting rough-in heights
- Sources
- FAQ
Toilet rough-in heights and clearances
The 12-inch rough-in, measured from the finished back wall to the centre of the closet flange, is the benchmark used by the overwhelming majority of toilets sold. It's what plumbers mean when they mention "the 135 rule" informally, referring to the trio of rough-in distances (10, 12, 14 inches) you're likely to encounter on a job. The 12-inch standard with 10 and 14 inch alternatives covers most homes, but older houses and tight ensuites sometimes use the narrower 10in spacing, while 14in occasionally appears where a thicker wall assembly or offset stack pipe demands it.
Clearance matters as much as the centreline distance. Building codes typically call for a minimum clearance of around a foot and a quarter from the toilet's centreline to any side obstruction, with wider spacing recommended for comfort. Front clearance should be at least a bit less than two feet from the bowl's front edge to the nearest fixture or wall, with more space recommended if possible.
- Measure the 12in dimension from the finished wall face, after tile and backer board are accounted for, not the stud face
- Confirm the flange sits level with, or very slightly above, the finished floor
- Dry-fit the toilet base before closing anything up
Pro Tip: Buy the toilet before you rough in the drain. Some compact or corner models use non-standard offsets, and confirming the exact rough-in on the box saves a very awkward flange relocation later.
Vanity plumbing rough-in: drain and supply heights
Vanity plumbing tolerates a bit more flexibility than a toilet, but the numbers still cluster tightly. The standard vanity drain centreline sits 16 to 20 inches above the finished floor, with supply stub-outs typically set at 20 to 22 inches. Supply lines are usually spaced about 8 inches apart, centre to centre, meaning roughly 4 inches either side of the drain line, hot on the left and cold on the right.
- Mark the drain centreline first, since everything else references it
- Set the two supply stubs symmetrically around that centreline
- Adjust upward for vessel sinks, which sit higher on the counter and need a raised drain connection
- Adjust the trap position slightly if the vanity has a deep undermount bowl or unusually shallow cabinet depth
- Dry-fit the cabinet carcass, including drawers, before finalising stub-out height
Cabinet layout catches people out more than the plumbing itself. A drawer-front vanity often has a shallow drawer box sitting directly behind the door, and if your P-trap and supply stubs project too far into that space, the drawer simply won't close. Vessel sinks and wall-mounted faucets frequently need bespoke heights that ignore the standard range entirely, so choosing your basin and vanity style before rough-in avoids a second visit from the plumber.
Pro Tip: Open the vanity's spec sheet or a showroom sample and hold it against your marked wall before cutting anything. Ten minutes of dry-fitting beats an afternoon of chasing plasterboard.
Shower and bath rough-in heights
Shower plumbing has more room for personal preference than toilet or vanity work, but there's still a working standard. The shower valve centreline is commonly set around 48 inches from the shower floor, with a practical range of 38 to 50 inches depending on who's using the shower and how the fixture is configured. Showerhead height usually falls between 72 and 80 inches above FFL.
- Tub and shower combination valves typically sit lower, around 28–30 inches above the tub floor
- Tub spouts are generally placed about 4 inches above the tub's rim
- Rain-style or fixed showerheads often sit toward the top of the 72–80in range; handheld or adjustable heads can sit lower
Household height genuinely changes these numbers. Taller occupants or households with specific accessibility needs often require higher-than-standard head placement, and if you're designing for wheelchair access or ageing in place, check your local accessibility standards rather than defaulting to the general range, since those requirements often specify controls within a lower, seated reach zone.
How to measure and mark rough-in positions correctly
Getting the numbers right on paper means nothing if the marking on site is sloppy. The sequence below is how experienced plumbers approach it, and it works just as well for a first-time DIYer with a laser level and a bit of patience.
- Establish your finished floor level first. Add the thickness of tile, backer board and thin-set to your subfloor height, then transfer that FFL to a chalk line around the room's perimeter before you touch a pipe.
- Gather the right tools. A tape measure, a laser level or spirit level, a framing square, a pencil, and printed cut sheets for every fixture you've chosen.
- Mark centrelines on the studs. Toilet, vanity drain, and shower valve positions all get a vertical line first, then horizontal marks at the correct height off your chalked FFL reference.
- Set drain height, then supply heights, working outward from each centreline.
- Dry-fit fixtures or cabinets wherever possible before cutting any finished stub.
- Photograph everything against a tape measure for your own record, and check it once more against the manufacturer's cut sheet.
Finish thickness alone can shift a rough-in by roughly three-quarters of an inch to a full inch, enough to bury a flange under tile or leave a drain stub sitting proud of the finished wall. That single measurement is worth double-checking before plasterboard goes up, because once it's closed in, correcting it means cutting the wall open again.
Common rough-in mistakes and how to dodge them
Measuring from the subfloor instead of the finished floor is, by a wide margin, the most common rough-in error tradespeople encounter. It sounds like a minor slip, but a near one-inch discrepancy is enough to leave a toilet flange sitting below the tile line, which then needs a flange extender or a full redo.
- Forgetting to allow for vanity drawers and internal cabinet fittings, which then collide with the P-trap
- Cutting supply and drain stubs too short to accommodate escutcheons and trim once tile is finished
- Skipping the dry-fit stage entirely, assuming standard dimensions will simply work
Pipe stubs need enough projection beyond the finished wall face to accept trim rings and escutcheon plates cleanly, so err slightly long rather than flush.
Pro Tip: Keep every cut sheet, plus a printed copy of your rough-in plan, taped inside a kitchen cupboard on site. It sounds basic, but it's the single fastest way to stop a second trade from "correcting" your careful measurements.
Quick reference: rough-in benchmarks and acceptable ranges
All measurements below are from the finished floor level (FFL) unless the row states otherwise.
| Fixture | Benchmark | Acceptable Range | Reference Point |
|---|---|---|---|
| Toilet centreline | 12in | 10in–14in | Finished wall |
| Vanity drain height | 16–20in | 16in–20in | FFL |
| Sink supply height | 20–22in | 20in–22in | FFL |
| Supply line spacing | 8in | 6in–8in centre to centre | Drain centreline |
| Shower valve height | 48in | 38in–50in | Shower floor |
| Showerhead height | 72–80in | 72in–80in | FFL |
| Tub/shower valve | 28–30in | 28in–30in | Tub floor |
How House A-Z helps first-time renovators get it right
Rough-in mistakes are expensive precisely because they're invisible until the wall is closed. House A-Z's project planning tools are built around that gap: finished-floor calculators, fixture checklists, and simple templates that flag when a chosen fixture's cut sheet doesn't match your planned rough-in.
- Track fixture selections and their cut sheets in one place, rather than a folder of PDFs
- Use pre-built checklists that prompt you to dry-fit before closing walls
- Share plans and measurements directly with your contractor to cut back-and-forth
Written by Azai, House A-Z's editorial team draws on plumbing industry references and contractor practice to keep guides like this one grounded in what actually happens on site, not just what the textbook says.
Drainpipe slope and positioning during rough-in
Drainage only works if gravity is doing the job properly, and that comes down to slope, not just position. The widely used standard for branch drain lines is a fall of a quarter inch per foot of horizontal run. Too flat, and waste water moves too slowly, leaving solids behind; too steep, and liquid outpaces solids, causing the same blockage from the opposite direction.
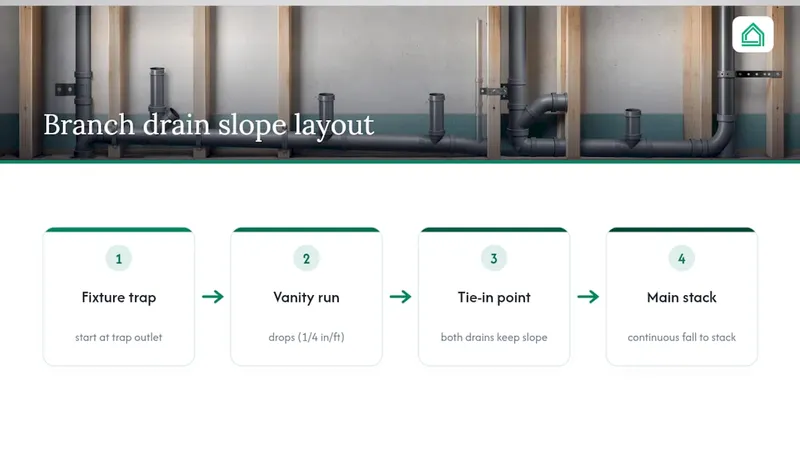
Positioning the drain during rough-in means working backwards from the fixture's trap to the main stack or branch line, keeping that quarter-inch-per-foot fall consistent along the entire run. For a vanity drain, this usually means the horizontal pipe drops slightly as it travels from the wall stub toward the stack, hidden inside the floor joists or a service void. Toilet drains connect more directly to the closet flange, but the horizontal run beneath the floor still needs the same consistent slope, particularly on longer runs where a poorly sloped section can sit dozens of feet from the vent.
Where two fixtures share a branch line, such as a vanity and a shower on the same wall, the plumber needs to plan the tie-in point carefully so both maintain adequate slope without one fixture's drain backing up into the other. This is one area where a DIY rough-in benefits enormously from a second pair of eyes, ideally someone who's plumbed a bathroom before, since a slope error is invisible until the floor is closed and the first blockage happens months later.
Vent pipe rough-in heights and locations
Every drain needs a vent to work properly, allowing air into the system so waste flows freely instead of glugging and gurgling on its way down. Vent pipes typically tie into the drain line close to the fixture, often within a few feet of the trap, and rise vertically before connecting to the main vent stack that exits through the roof.
Height-wise, vent connections are governed more by their relationship to the fixture's trap than by a single fixed FFL number. The vent must connect above the trap's weir (the point where water sits in the trap) to prevent siphoning, which would otherwise pull the water seal out and let sewer gas into the bathroom. For a standard vanity or sink, this usually places the vent tie-in somewhere in the wall cavity above the drain stub, sloping upward to meet the stack.
Toilets and showers, which sit lower and closer to the floor, often use a wet vent arrangement, where a single pipe serves as both drain and vent for a nearby fixture, provided the layout meets local code requirements for pipe sizing and distance. This is an area where local rules vary more than almost any other rough-in dimension, since wet venting rules, maximum trap-to-vent distances, and acceptable pipe diameters differ from one jurisdiction to another. It's worth having a plumber confirm the vent layout even on an otherwise straightforward DIY bathroom, because a poorly vented drain won't show a problem immediately. It shows up weeks later as slow drainage or unpleasant odours.
Floor drains and cleanouts: rough-in considerations
Floor drains and cleanouts don't get nearly as much attention as fixture rough-ins, but getting them wrong causes some of the messiest repairs in a bathroom. A floor drain, common in wet rooms and some shower configurations, needs to sit at the lowest point of a gently sloped floor, typically falling around a quarter inch per foot toward the drain from every direction, so water never pools.
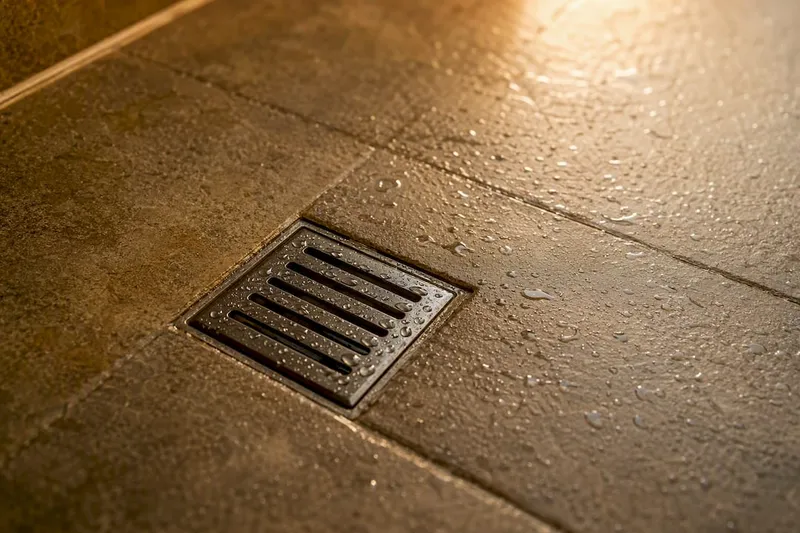
Setting the drain height itself happens before the finished floor goes down, and it needs to account for the full thickness of the mortar bed, waterproofing membrane, and tile that will sit above it. Get this wrong, even by a small margin, and you either end up with a drain that sits proud of the finished floor, catching toes and mop heads, or one buried slightly low that traps standing water around its edge.
Cleanouts serve a different purpose entirely: they give future plumbers and drain snakes access to clear blockages without digging up the entire run. Codes generally require a cleanout at the base of the stack, at significant changes of direction in the drain line, and at reasonable intervals along long horizontal runs. During rough-in, that means leaving the cleanout fitting accessible, either behind an access panel or beneath a removable fixture, rather than burying it permanently behind tile or plasterboard where nobody can reach it again.
Wall framing and blocking effects on fixture heights
The stud wall behind your fixtures does more work than most people realise. Standard framing gives you a stud face to measure from, but the actual rough-in height depends heavily on whether blocking, the horizontal timber or noggins fitted between studs, has been installed at the right point to carry the fixture's weight.
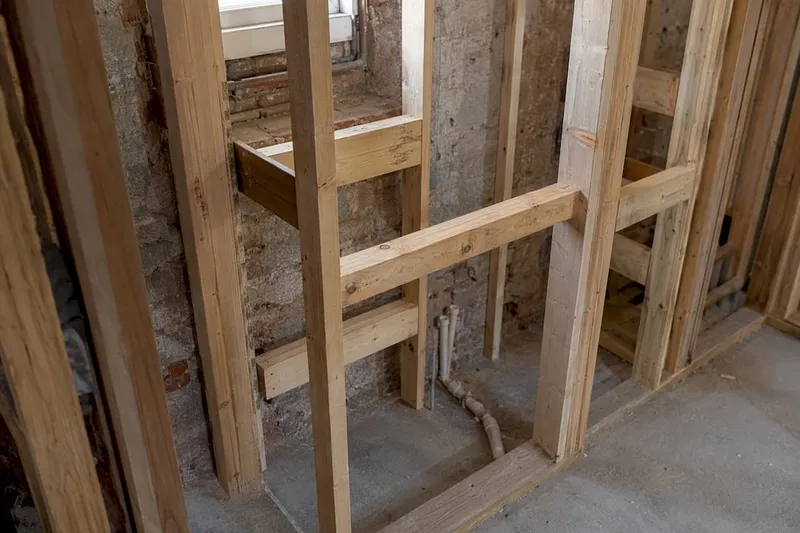
Wall-mounted vanities, grab bars, and heavier fixtures like cast iron tubs all need blocking positioned precisely where the mounting hardware will land, and that has to be decided before plasterboard goes up, based on the exact fixture you've chosen. Get the blocking height wrong, even by an inch, and you're either drilling into empty cavity or, worse, discovering the blocking sits just below where you actually need it once the fixture arrives.
Shower valves and tub spouts also depend on framing more than most DIYers expect. The valve body needs a solid mounting point at the correct depth so it sits flush once tile is applied, and that depth changes depending on your planned tile thickness plus any additional waterproofing membrane, both of which affect bathroom waterproofing requirements around wet areas. If the framing crew and the plumber aren't working from the same finished-wall thickness assumption, the valve either sits recessed too far or protrudes awkwardly through the tile. Confirming that assumption on paper before either trade starts is one of the cheapest checks in the entire rough-in process.
What actually matters when you're setting rough-in heights
Most guides to rough-in heights hand you a table of numbers and leave it there, as though plumbing were a single universal standard rather than a set of common defaults that manufacturers routinely deviate from. That's the gap worth naming plainly: the 12-inch toilet rough-in, the 48-inch shower valve, the 16–20 inch vanity drain, these are starting assumptions, not guarantees, and treating them as fixed is how expensive rework happens.
What the evidence actually supports is sequencing. Choose your fixtures before you mark a single stud, because a vessel sink or a wall-mounted faucet throws every standard number out. Measure from the finished floor, not the subfloor, because that one habit prevents the single most common error in the trade. Dry-fit everything you can before the wall closes, because a ten-minute check beats a torn-out cavity.
Conventional advice treats rough-in as a plumbing task. It's really a planning task with plumbing consequences, and that's exactly where a clear checklist, whether from House A-Z's bathroom remodel project plan or your own site notes, earns its keep before the pipes go in, not after.
— Azai
Sources
- Bathroom rough-in plumbing dimensions guide — The Spruce
- Shower valve and showerhead height guidance — Homedit
- Bathroom plumbing rough-in dimensions — The Home Depot
Always confirm final figures against your local building authority and the specific fixture's manufacturer cut sheet.
FAQ
What is the 135 rule in plumbing?
It refers to the three common toilet rough-in distances, 10, 12, and 14 inches, measured from the finished back wall to the drain centreline. Twelve inches is the standard; 10 and 14 are exceptions used in constrained or older layouts.
How high should sink water supply lines be roughed in?
Supply stubs for a vanity or sink are typically set 20 to 22 inches above the finished floor, spaced about 8 inches apart, hot on the left and cold on the right.
What is the recommended rough-in height for toilet lines?
The standard toilet drain rough-in is 12 inches from the finished wall to the flange centreline, though some layouts use 10 or 14 inches. The height should always be checked against the specific toilet's cut sheet.
How high should a sink drain be roughed in?
Vanity and sink drains are typically roughed in 16 to 20 inches above the finished floor level, adjusted upward for vessel sinks or higher counters.
Should I measure rough-in heights from the subfloor or finished floor?
Always measure from the finished floor level. Tile, backer board and thin-set can add three-quarters of an inch to a full inch, enough to misalign a drain or bury a flange if you measure from the bare subfloor.
Recommended
- Room dimension standards: legal minima and practical sizing | House A-Z Blog - House A-Z
- Bathroom remodel steps in the correct order | House A-Z Blog - House A-Z
- Bathroom remodel project plan: checklist and Gantt guide | House A-Z Blog - House A-Z
- UK bathroom renovation costs: your 2025–2026 price guide | House A-Z Blog - House A-Z