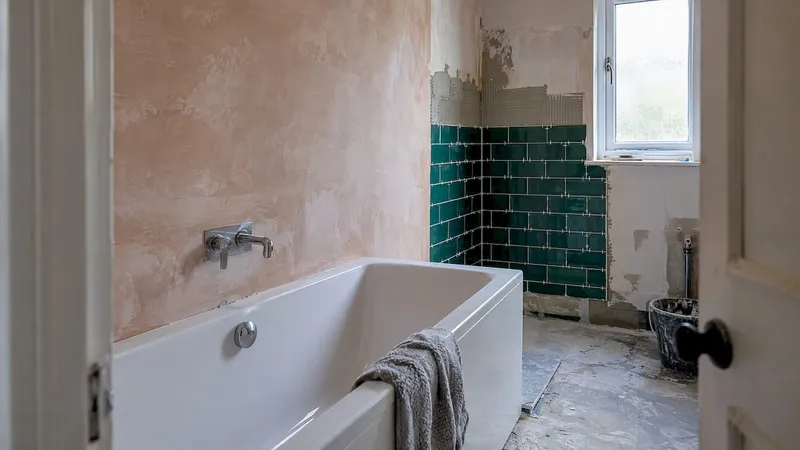
A full bathroom remodel typically runs from six weeks to three months from planning to punch list, according to Sweeten. A cosmetic refresh lands near the short end, a gut remodel near the long end. The biggest factor is scope: moving plumbing or wiring, and whatever hidden conditions appear once the walls are open, decides where your job falls.
TL;DR:
- Order bespoke vanities, custom glass, and special tiles first, and confirm delivery dates; moving plumbing or wiring may require permits and inspections before work starts.
- Allow 1–2 weeks for waterproofing, tiling, grouting, and curing, then about a week for fixtures; drying time cannot be rushed.
- An industry survey found that 24% of homeowners uncovered water damage or similar hidden problems after demolition, so place a contingency buffer immediately afterward.
- Lock the layout and finish choices before demolition, and agree how changes affect cost and timing; changes during work can trigger reorders and rescheduled trades.
Table of Contents
- Timeline at a glance: two sample schedules
- What happens before the builders arrive?
- The on-site sequence from demolition to handover
- What causes delays and how much time do they cost?
- How do you turn stage timings into a homeowner Gantt chart and buffer?
- How do you keep the remodel on schedule day to day?
- A note for first-time renovators
- How House A-Z helps you plan timelines and manage deliveries
- FAQ
- Sources
Timeline at a glance: two sample schedules
Pick the model closest to your project, then adjust. These ranges are planning estimates drawn from the practitioner sequences later in this guide, not guarantees.
- Cosmetic update: planning takes as long as your design choices and materials require, then the on-site work follows. Think new vanity, paint, fittings, perhaps a fresh floor, with the existing pipework left where it is.
- Full gut remodel: planning time varies with the scope and material lead times, then the on-site work follows. This covers stripping to the studs, moving plumbing, new tiling and new fixtures.
- Bespoke or structural work: custom glass, made-to-measure vanities, wall changes and permits can push either total higher, sometimes by weeks.
Notice that the planning column is nearly as wide as the on-site column. Homeowners tend to budget for the weeks the builders are in the house and forget the weeks before they arrive. A job that looks short on site can take much longer from first sketch to finished room.
What happens before the builders arrive?
Pre-construction is where most schedules are quietly won or lost. Nothing glamorous happens, yet every task here sets the start date for the trades.
- Planning and design: choosing the layout, picking tiles and fittings, and signing off drawings. Your own decision speed is the main variable. Dithering over a basin delays the project.
- Ordering: off-the-shelf items often arrive within days or a couple of weeks, while bespoke vanities, custom glass and special-order tiles take far longer. Order the slowest items first.
- Permits and inspections: lead times vary widely by area and by scope. Moving plumbing or electrics usually triggers more paperwork than swapping fittings in place, so check early and build that into your start date.
- Accurate drawings: Houzz stresses advance ordering, accurate drawings and a clear brief for contractors, all of which cut change orders and delays.
Finishing items deserve the same early attention. Interior doors, for instance, can hold up a handover if they are measured late, and quick door replacement specialists show how much a tidy, well-planned installation saves at the end.
Pro Tip: Keep a procurement log from day one, listing each item, supplier, order date and promised delivery date. Our renovation procurement log guide gives a template and simple lead-time rules you can copy.
The on-site sequence from demolition to handover
The order of work matters as much as the duration of each step. Tiling, for example, needs curing and drying time between grouting and sealing that cannot be rushed. As a baseline, we use the sequence published by This Old House, then explain what is going on at each stage. Our guide to bathroom remodel steps in the correct order covers the same ground in checklist form.
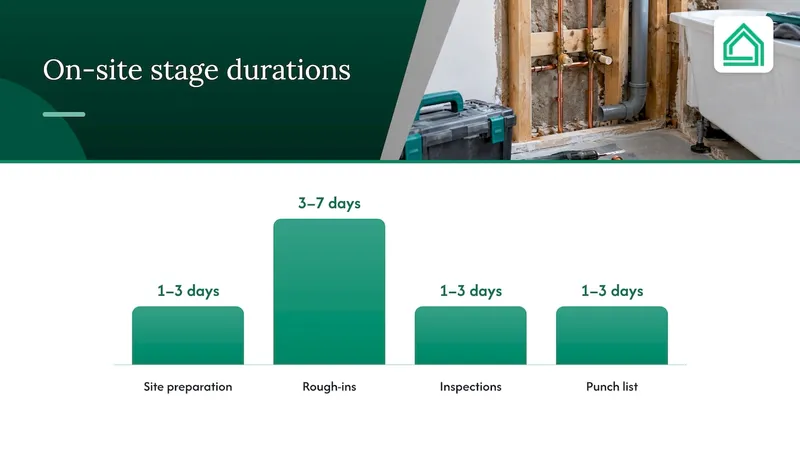
- Site preparation and demolition (1–3 days). Protect floors and the route through the house, shut off water, then strip out the old suite, tiles and fittings. This is also when surprises surface, so expect your first phone call from the builder here.
- Plumbing and electrical rough-ins (3–7 days). Pipes, drains, wiring and extractor ducting go in while walls and floors are open. Moving a toilet or shower position sits at the long end of this range.
- Inspections (1–3 days). A building or plumbing inspector checks the rough-ins before anything is covered. Booking the slot ahead of time stops the crew standing idle.
- Wall preparation, tiling and flooring (1–2 weeks). Waterproofing, backer board, tile setting, grouting and sealing, with curing time built in. Rushing this stage is the classic route to cracked grout and leaks, so treat the drying windows as fixed.
- Fixtures and final finishes (about 1 week). Vanity, toilet, shower fittings, lighting, mirrors and final paint go in. Late-arriving fittings hurt most here, because the whole crew is waiting on one box.
- Punch list and final walkthrough (1–3 days). Walk the room with your contractor, note chips, gaps and drips, and agree a date to fix them. Collect warranties and manuals before the final payment.
Add those stage ranges together and a full job lands somewhere between about three and four weeks at the short end and noticeably longer once you include tiling cure time, inspection waits and any hidden repairs. That is why the full gut estimate earlier runs wider than the sum of tidy day counts.
For a small cosmetic update, several stages vanish. There is no rough-in and no inspection, so you move from light strip-out to fixtures in a few days, with painting and sealing set around the drying times of each material.
One practical habit helps at every stage: check progress against this list weekly. If demolition is taking longer than expected, ask why and adjust the rest of the programme straight away instead of hoping to catch up later.
What causes delays and how much time do they cost?
Most delays come from a short list of repeat offenders. Knowing them lets you plan around them instead of being surprised.
- Hidden conditions: water damage, rotten subflooring and outdated wiring only show once the walls are open. In an industry survey reported by This Old House, 24% of homeowners found unexpected water damage or similar hidden conditions after demolition. Remodellers can include a contingency window to absorb these repairs.
- Late deliveries and backorders: a single missing tap or tile delivery can stall the tiling or fixture stage. Bespoke items are the usual culprits, which is why we say order them first and confirm dates in writing.
- Inspection and permit holds: the typical pattern is a rough-in finished on time but an inspector unavailable for several days. Booking inspection slots early, and asking your contractor to do the same, shortens the gap.
- Owner decisions and scope creep: changing a layout or upgrading a finish halfway through usually means re-ordering, re-doing work and re-scheduling trades. Lock your choices before demolition and agree in advance how any change will be priced and timed.
Treat each of these as a named line in your programme with a buffer attached, rather than a vague worry. A delay you planned for is an annoyance. A delay you did not plan for is a crisis.
How do you turn stage timings into a homeowner Gantt chart and buffer?
A Gantt chart is simply a list of stages with start and finish dates. You do not need special software to build a useful one. Our bathroom remodel project plan and Gantt guide goes deeper, but the method fits on a page.
- List the stages from the on-site sequence, plus the pre-construction tasks above.
- Set the fixed start date by working backwards from your longest lead time, whether that is a permit, a bespoke vanity or your contractor's availability.
- Assign durations from the stage ranges, using the higher number if your bathroom is small, awkward or old.
- Mark dependencies, such as tiling cannot start until inspection passes and fixtures cannot start until grout has cured.
- Add a contingency buffer after demolition for hidden works.
- Book trades last but not late: confirm plumbers, electricians and tilers once your long-lead items have firm delivery dates, so no one arrives to an empty site.
For a cosmetic update, allow time for planning and the on-site work, with a buffer at the end. For a gut remodel, allow ample time for planning and on-site work, with a buffer straight after demolition.
Pro Tip: Put the buffer in the programme, not in your head. If you tell family and guests the bathroom will be ready on the first date, the buffer is already gone.
How do you keep the remodel on schedule day to day?
Once work starts, small habits protect the programme better than any heroic catch-up.
- Keep the procurement log live. Confirm every lead time in writing and chase any delivery that has not shipped before it is due.
- Hold a pre-construction meeting and set daily or weekly check-ins, working hours and written rules for changes. Our contractor meeting agenda items give you a ready list.
- Plan a temporary bathroom before demolition, whether that is a second bathroom, a gym membership or a short stay with relatives. Hygiene and routine matter more than they sound when the job runs over, and our survival guide for living at home during renovation covers the practical details.
- Collect handover documents such as warranties, product manuals and inspection sign-offs, so any later fault is covered.
A note for first-time renovators
Timing discipline is the cheapest upgrade in any remodel. Most overruns I see described come from late decisions and missing parts, not from the building work itself, and a written schedule with a buffer turns surprises into manageable line items. Clients tell us it helps them avoid costly mistakes.
— Azai
FAQ
How long does a typical bathroom remodel take?
A full remodel commonly takes six weeks to three months from planning to punch list, according to Sweeten. Cosmetic updates finish faster, and moving plumbing or wiring pushes the timeline longer.
In what order should a bathroom remodel be done?
Work runs from demolition to plumbing and electrical rough-ins, then inspection, then wall preparation, tiling and flooring, then fixtures and finishes, and finally the punch list. The order matters because each stage depends on the one before it, and tiling needs curing time that cannot be rushed.
How long does it take to remove and fit a new bathroom?
Removal usually takes a few days, and fitting runs through rough-ins, tiling and fixtures over the following weeks. This Old House gives 1–3 days for demolition and about 1 week for final fixtures.
What is the hardest part of a bathroom remodel?
Dealing with the unknown is usually the toughest part: hidden water damage, late deliveries and changing your mind midway. A contingency buffer, a procurement log and decisions locked before demolition tame most of it.