Managing renovations across several properties works when you treat them as one programme with shared rules, not as separate projects that happen to share an owner. Decide once what applies everywhere, record what is unique to each building, stagger the work, and keep a single budget and a single record of decisions. House A-Z is built for exactly this: budget tracking, project management and contractor collaboration in one place, so a second or third property does not mean a second or third spreadsheet.
This guide is for first-time builders, landlords-in-the-making, couples renovating a home and a rental together, and contractors juggling several jobs for one client. It gives you the routine, step by step, and shows where it tends to go wrong.
TL;DR
- Split decisions into two piles: standards that apply to every property (finishes, suppliers, reporting) and site facts that belong to one building (access, layout, occupancy).
- Stagger the work. Finish one property's messy phase before starting the next, and use the first site to test your assumptions.
- Run one budget with a contingency line and a monthly check against actual spend, not a pot per property.
- Name one decision-maker, hold regular check-ins and keep photos and approvals in one shared record.
- Keep everything in a single platform so every contractor, partner and property sees the same plan.
Table of Contents
- Why several properties are harder than one big one
- Step 1: Decide what is shared and what is site-specific
- Step 2: Build the schedule around sequence, not speed
- Step 3: Coordinate contractors with one routine
- Step 4: Run one budget, not several
- Step 5: Keep quality and records in one place
- Putting it together: a worked example
- Choosing the right House A-Z plan
- Our perspective
- FAQ
- Sources
Why several properties are harder than one big one
The difficulty is not distance. It is repetition without memory. Each building brings its own contractor quotes, its own surprises behind the plaster, its own local authority and its own timeline. If every property is run as a fresh project, you re-decide the same things (which tiles, which boiler, who signs off a change) and get slightly different answers each time.
Three things multiply as you add properties:
- Decisions. Ten choices per property become thirty across three, and any you forget to record will be remade differently.
- Contractor conversations. Different trades, different availability, different ways of reporting progress.
- Money in flight. Deposits, stage payments and variations land at overlapping times, so a small overrun on one site quietly eats the cash meant for another.
First-time builders feel this fastest, because there is no routine to fall back on. The good news is that a routine is easy to build, and it starts before the first hammer swings.
Step 1: Decide what is shared and what is site-specific
This is the highest-value hour of the whole programme. Make two documents.
The master standards sheet holds everything you want identical across properties:
- Approved finishes, paint colours, fixtures and the exact product references
- Preferred suppliers and any trade accounts
- The level of quality you expect and how you will check it
- How contractors report progress and how changes are approved
A site sheet per property holds what only that building has:
- Access limits, parking and delivery restrictions
- Whether the property is occupied, and when tenants or family are away
- Existing conditions, from damp to dated wiring
- Local permissions and who handles them
The point of splitting them is control over variation. Consistency should be deliberate, and so should difference. When a site quirk forces a change, you record it on that site's sheet instead of letting it quietly rewrite your standards everywhere.
Where it goes wrong: people write the standards in their head. By property three they cannot remember why the bathroom at property one has a particular tap, and neither can the plumber.
A clear written scope is the backbone of both documents. Our guide to writing a scope of work for a renovation walks through what to include, and you can reuse that structure for every property.
Where House A-Z helps
Our platform lets you keep your plan, budget, product choices and room layouts together, with product tracking and room mapping alongside the project management tools. That means the finish you chose for one property sits next to the one you chose for the next, instead of in a folder you have to hunt for.
Step 2: Build the schedule around sequence, not speed
The instinct is to start everything at once so it all finishes together. That usually backfires, because you are one person (or one couple) with one phone. Sequencing beats spreading thin.
A practical order of play:
- Rank the properties by urgency, readiness and dependencies. A property with planning permission sorted and materials ordered goes before one still waiting on a quote.
- Use the first property as your test. It teaches you how long installation really takes, how disruptive the work is for occupants and whether your chosen materials behave. Feed those lessons into the next site.
- Stagger the noisy phases. Demolition, first fix and plastering are the moments you are most needed. Do not let them land in the same fortnight at two addresses.
- Plan around the slowest approval. If one council takes noticeably longer to return building control or planning decisions, build the whole timetable around that reality and treat any quicker property as a bonus.
- Add buffer. Weather, inspections and late deliveries happen. A cushion of 10 to 15 per cent on each timeline is a sensible starting point, and confirm each contractor's real availability before you fix dates.
There is serious research behind the idea that order matters. A 2022 study in the Journal of Management in Engineering built a model that optimises the order in which units in leased buildings are renovated, choosing crew deployment and the unit sequence to minimise total net renovation cost, and tested it on a real case of three renovation projects. You do not need a model to benefit from the principle: the order you do things in is a lever on cost.
Inside each property, sequence the trades so that one never undoes another's work. Flooring before overhead work or painting is finished is a classic mistake that puts new materials at risk. If you are new to this, a visual timeline helps enormously, and our guide to renovation Gantt charts that stay in sync with your budget shows how to lay one out. For a single room as a sample of realistic durations, see the bathroom remodel timeline.

Where it goes wrong: a single completion date. Break each property into milestones (scope approved, materials ordered, strip-out done, first fix done, finishes done, final checks, handover) so you can see a delay when it is a week old, not a month old.
Readiness before you start a site
Before a property enters the active phase, confirm a short gate:
- Design and scope are agreed
- Any permissions are applied for or granted
- The budget is approved, with contingency
- Long-lead items (windows, kitchens, bespoke joinery) are ordered
Anything on that list that is missing is a reason to start a different property first. If you are mid-way through deciding whether one property is worth the effort at all, some owners conclude a tired rental is better sold than renovated, and a guide on selling a rental property in Miami covers that route for Florida owners.
Step 3: Coordinate contractors with one routine
The more properties you run, the more your contractors need the same simple rules, so they do not each invent their own.
Vet once, against a standard. Check each contractor against the same criteria: availability, references, insurance and how they price changes. Our contractor onboarding checklist includes verifying three references, and the same list works for every trade on every site.
Kick off every site the same way. A short meeting covering scope, dates, access, deliveries and who cleans up prevents most early arguments. Our renovation kickoff agendas give you two timed formats you can reuse.
Write down who decides what. Before work starts, confirm in writing:
- Who chooses products and finishes
- When each choice is due
- Who approves a substitution
- What happens if a decision is late
A late tile decision is a classic way for a one-week job to become three.
Pick one accountable person. For a couple, that might be one partner who has the final say on the schedule while the other leads on design. For a contractor with several jobs for the same client, it is the named lead per site. One name, with the authority to act, stops questions bouncing between people.
Keep a steady rhythm. A short weekly update per site, in the same format every time, beats ad hoc phone calls. A useful format has four lines: work completed, work next, decisions needed, concerns.
Where it goes wrong: information lives in WhatsApp threads, emails and the plasterer's memory. House A-Z gives partners and contractors a shared place to work from, so the update is one tap away rather than buried.
Step 4: Run one budget, not several
Money is where multi-property work bites hardest. Three habits keep it under control.
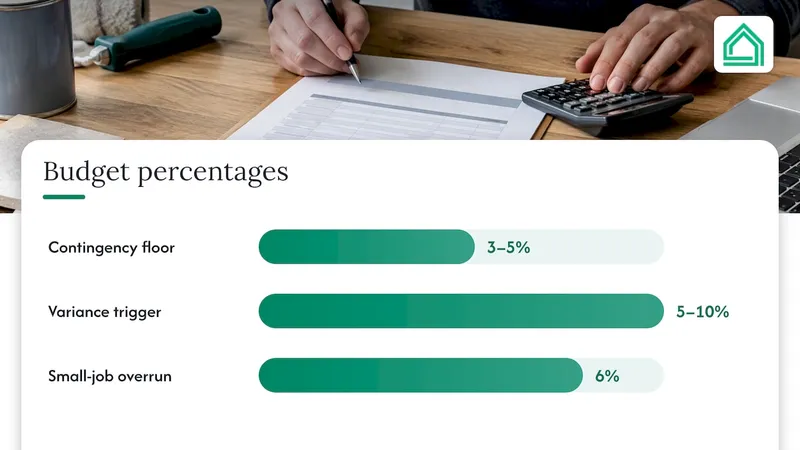
1. One budget, one contingency. Build a budget per property but view them together. Industry guidance for multifamily operators recommends always including a 3 to 5 per cent contingency line, and that is a sensible floor to start from. Older buildings often deserve more, because hidden defects are likelier.
2. Review monthly against actual spend. The same source recommends reviewing the budget monthly against actuals and investigating variances once they pass roughly 5 to 10 per cent. Do this per property and for the programme as a whole. A 6 per cent overrun on a small job may be trivial; the same overrun repeated on three sites is a pattern.
3. Treat the budget as a living document, but record every change. Budgets should move when reality moves. What matters is that each change has a reason and a date, so you (and any partner or lender) can see what changed and why. Too many unexplained changes confuse everyone on site.
A few more habits worth adopting:
- Buy shared items together. If you are fitting the same tap or flooring in three properties, ordering the total volume at once gives you a stronger hand with suppliers than three small orders.
- Stagger big-ticket spends. Replacing every boiler or roof in the same quarter drains cash. Spreading them across the year protects your reserves.
- Keep a cash cushion separate from the contingency. Contingency covers surprises in the work; cash reserves cover the gap between paying contractors and getting rent or sale proceeds.
Where it goes wrong: each property gets its own spreadsheet, each with different categories, so you cannot add them up. With House A-Z's budget tracking and AI agents, which give insights based on your budget, preferences and timelines, you work from one consistent structure and get plain-language budget-saving proposals along the way.
Step 5: Keep quality and records in one place
Quality control across properties is a system, not a personality. You cannot stand in every hallway, so you need routines that do the looking for you.
A workable definition comes from a Canadian housing guide, which describes quality control as monitoring contractor performance, inspecting the work regularly and reviewing and approving mock-ups and material samples. Translate that to your programme:
- Approve a sample first. Have the contractor finish one room or one detail and sign it off before repeating it everywhere.
- Inspect on a schedule. Use the same checklist on every site visit: workmanship, progress against the milestones, tidiness and safety.
- Photograph at every milestone. Dated photos settle disputes quickly and protect both owner and contractor. Our guide to three-phase photo documentation shows what to capture and when.
- Book inspections properly. Wasted visits cost days. Our inspection scheduling steps show how to avoid them.
For anything technical, structural, electrical or gas related, scaling up does not change the rule that qualified professionals do the work, and your local council's building control team confirms what needs approval in your area. Rules differ by council and nation within the UK, so check each property's location rather than assuming one answer applies to all.
Finishing properly
Handover is where programmes lose their tidiness. Keep warranties, certificates and manuals for each property together using a handover checklist, and plan upkeep with our guide to post-renovation maintenance. If the properties are lets, the rental make-ready checklist gives you a room-by-room standard for getting each one back on the market.
Putting it together: a worked example
Imagine a couple renovating their own home and a small rental, with a third flat to follow. Here is how the routine plays out.
- Week 0: they write one standards sheet (paint, flooring, sanitaryware, a short list of suppliers) and a site sheet for each address.
- Week 1: they rank the properties. The rental has permissions in place and materials available, so it goes first. The home waits for a long-lead kitchen order.
- Weeks 2 to 6: the rental is renovated. They note that the plasterer needed an extra week for drying, and they add it to the buffer for later sites.
- Week 6: a short review: what ran late, what was cheaper than expected, which finish proved a headache. The standards sheet is updated.
- Weeks 7 onwards: the home starts, with a more realistic timeline and a contingency set after seeing real overruns.
Nothing here is complicated. It is simply consistent, and consistency is what makes the third property calmer than the first.
Our perspective
Multi-property renovation fails at the same point every time: the second property. The first one gets your full attention and a careful plan. By the second, the plan lives in three apps, two spreadsheets and a few chats, and nobody can say which version of a decision is the real one.
That is the chaos we built House A-Z to remove. We believe first-time builders and owners should not need a project director's toolkit to stay in control. Budgets, product choices, room layouts, permit guidance, contractor collaboration and shareable exports belong in one interface, in plain language, so the plan is the same for you, your partner and your trades.
Our AI agents give personalised insights based on your budget, preferences and timelines, so you can spot a costly mistake while it is still a line on a plan rather than a bill. One user told us it saved them €20K in potential errors. We want that clarity to be the normal experience of building, not the lucky one.
Start with one standard, one budget and one shared record. Add properties as you go. The routine scales; your stress does not have to.
Azai
FAQ
How do I manage renovations on several properties at once?
Create one master standards sheet and one short site sheet per property, then stagger the noisy phases so you are not needed in two places at once. Keep a single budget with a contingency line and one shared record of decisions, photos and approvals. A platform like House A-Z keeps all of this in one place.
Should I renovate every property at the same time?
Usually not. Start with the property that is most ready, use it to test timings and materials, then apply what you learn to the next. Overlapping only the quieter phases keeps you able to supervise and keeps cash flow manageable.
How much contingency should I hold?
A common recommendation for multi-property budgets is 3 to 5 per cent as a minimum contingency line, reviewed monthly against actual spend. Older or unseen-condition properties often justify more, so set it per property once you have surveyed each one.
Do I need a project manager?
Not necessarily, if you have a clear routine and good tools. You need one accountable person per site and a consistent reporting rhythm. Contractors managing several jobs for one client can use House A-Z's Enterprise plan, from €99 per month, for contractor collaboration and property management.
Can couples and contractors work from the same plan?
Yes. House A-Z is designed for partners and contractors to collaborate on the same budget, designs and timeline, so decisions are made once and everyone sees them. The Pro plan is €29 per month.
Sources
- Episode 6.14 Transcript, IREM podcast on multifamily budgeting
- Optimal Planning of Renovation Work in Leased Buildings, Journal of Management in Engineering
- Housing Provider Kit: Managing Housing Assets guide, BC Housing